The Red Menace

There are three types of people.

There are folks who like brown/mushroom gravy inside, outside, and on the side of their meatloaf.  And there are those who love meatloaf to come sporting a shiny red cap of glaze.

I actually have a Kitchenaid, but other than that, this looks exactly like me when cooking.

But there are the enlightened ones, those noble humans whom, like myself, have love for both varieties.

The Kid?  Not so much.  That child likes red meatloaf about as much as flat beer and the heartbreak of psoriasis.  If it ain’t brown, The Kid ain’t down.

There is one little logistical glitch, though, with red meatloaf.

We can do way better than this…

When I make brown meatloaf, I start by making a nice, rich mushroom gravy.  I then use it in the mix, I ladle it over the top for baking, and spoon it over the mandatory buttermilk mashed potatoes.  And no matter its complexion, with an old school protein like meatloaf, potatoes are in fact, mandatory.

French fries just don’t work.  It’s like black suede boots with a white eyelet dress.  Baked potatoes are an option, but fully dressed is an awful lot of starch and fat.  And red meatloaf isn’t terribly flashy as a main, you don’t want it to disappear completely next to the showgirl that is a loaded spud.

My answer is to serve braised baby potatoes.

Braised Baby Potatoes with Herbs

braised creamers

2 pounds baby potatoes or little creamers, washed
1 cup beef stock
4 tablespoons butter
1 teaspoon kosher salt
½ teaspoon freshly ground pepper
1 tablespoon chopped fresh parsley
1 tablespoon chopped herb of your choice (like chives, dill, or tarragon)
Throw everything into a large heavy pot with a lid.
Cover and cook on medium until the potatoes are fork-tender (15-20 minutes), stirring frequently.
Uncover and let the liquid cook down into a thick, buttery sauce.
Right before service, stir in herbs and check for seasoning. Makes 4 servings.

I’ve broken down the meatloaf into small steps.You can do them early in the day; or even the day before, then put it together right before baking.

Red Glazed Meatloaf

Glazed onions:

glazed onions

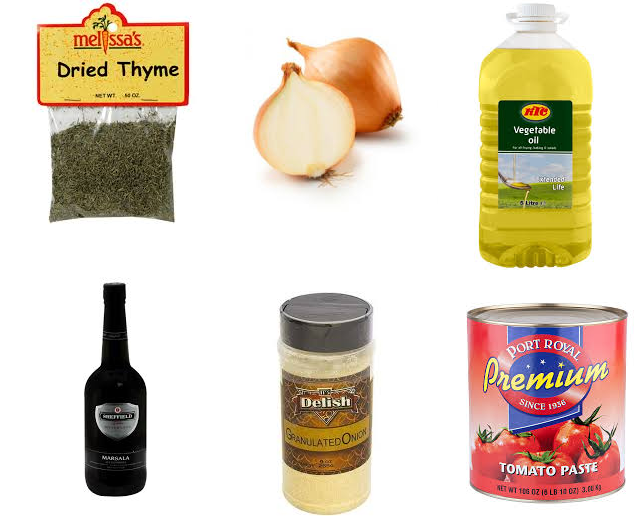
1 yellow onion, chopped

1 tablespoon vegetable oil

½ teaspoon dried thyme

½ tablespoon granulated onion

1 tablespoon tomato paste

½ cup Marsala wine

Pinch of salt and pepper

Directions:

Heat a skillet and add veg oil.  Put in chopped onion, thyme, granulated onion.  Cook until onions start to brown around the edges.  Stir in tomato paste.  When the paste darkens, pour in Marsala.  Let the wine cook out, then take off heat.

Meatloaf mix:

red meatloaf

4 slices multi-grain bread, ground fine in a food processor

4 eggs 

1 tablespoon Worcestershire sauce

2 tablespoons horseradish

2 pounds ground chuck

Salt and pepper

Directions:

In a large bowl, place in bread crumbs, eggs, Worcestershire sauce, and horseradish.  Add cooked onions.  Mix everything with vigor until it is a homogenous mass.  Break beef into large chunks and put in bowl.  Using clean hands or disposable gloves, mix meat and bread crumb mix until it is completely mixed in.  Form into loaf shape.

Glaze:

red glaze

1 cup ketchup, divided

1/4 teaspoon smoked paprika

2 teaspoons brown sugar

2 teaspoons balsamic vinegar

2 teaspoons horseradish

Pinch salt and pepper

Directions:

Take out ½ cup of ketchup and set aside.  Whisk together the other half cup of ketchup and the rest of the glaze ingredients.  Spread 1 tablespoon of this in the bottom of the dish in which you’re baking the meatloaf.  Using a paint brush, paint the glaze all over the meatloaf.

Bake at 350 for 40 minutes.  Remove from oven and pour/paint the plain ketchup on the top.  Return to oven and bake 30 minutes more.

Remove from oven and let rest for 20 minutes before service.  Serves 5-6.

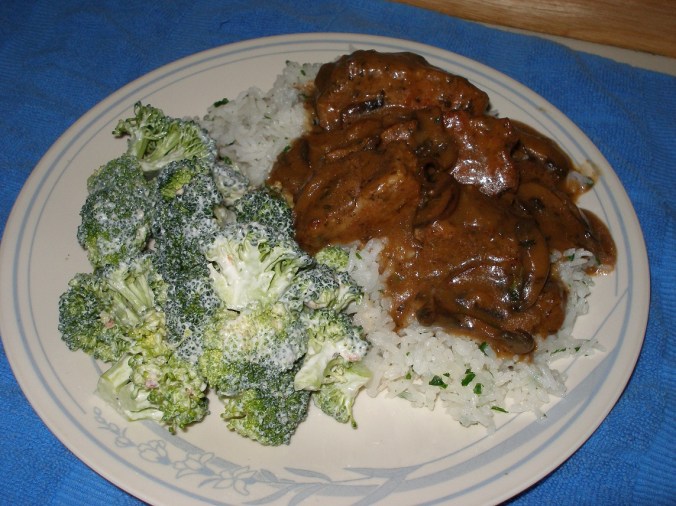
I served this with my cool, crunchy broccoli salad.

Bacon Broccoli Salad

broccoli salad 2.0

4 large stalks of broccoli
4 pieces bacon
1/3 cup grated parmesan, divided
1 cup mayonnaise
Hot water
½ teaspoon salt
¼ teaspoon pepper
Place bacon on parchment-lined rimmed baking sheet. Put it in the oven, then set oven to 350 (if you put the bacon into a hot oven it will seize up and never fully render; it also keeps the slices flatter). Cook for 15 minutes, flip each piece over and cook until it is golden brown and crispy. Remove from oven to a paper-towel covered plate. Reserve ¼ cup bacon grease for dressing.
While the bacon is cooking, cut the broccoli into small, bite-size florets. Place into a large bowl with half the cheese.
For dressing, whisk together mayo, bacon fat, and parmesan. Thin with hot water, a little at a time until it’s the consistency of pancake batter. Mix into broccoli until it’s lightly coated. Refrigerate until service. Makes about 8 servings.

If you have leftovers, the meatloaf makes epic sandwiches.  Just slice and put it in a hot skillet.  Cook until it browns and forms a crust.  Flip and cook the other side then melt a thick slice of horseradish cheddar on it.

You know, I’ve been thinking about that “three kinds of meatloaf people” philosophy, and I think I need to amend it.

What if you don’t eat red meat? Or you like it cheese-stuffed, or bacon wrapped?  Maybe you like it spicy, or Horrors! What if you actually don’t like meatloaf at all?

You know…there is one meatloaf that I could live without.

Thanks for your time.

Definitely Dixie (kind of)

I’m broken, and it’s all because of my mom, The Kid, and Fresh Market.

I used to be like all the other proper Southern children and eat any pimento cheese that was offered.  And like any good Southern child, ate it on spongy white bread.

But then two things happened that changed everything, and broke me.

First, my mom came to visit from Greensboro one day.  I honestly don’t remember her ever having arrived empty-handed.  Well, on this fateful day, knowing that I love both pimento cheese and Fresh Market and she brought me a tub of the goo they make in-house at that culinary Aladdin’s cave.

Secondly, when The Kid was in middle school we made a trip to the supermarket.  In the chip aisle, my spawn asked for a specific bag of pretzels.  The ones requested were Utz Special Dark sourdough; another kid had brought them for lunch, and they were a big hit among the lunchroom set.

They were also a hit at Chez Matthews, I took to keeping them around for The Kid’s lunch and to munch on.

One day I had some fresh pimento cheese from Fresh Market in the fridge.  I also had a bag of dark pretzels on the counter.  I wandered into the kitchen looking for something on which to snack.  I pulled out the cheese, and opened the pretzels.  I dunked and tasted.

My whole world shifted.

When The Kid was little and faced with a new food, I used to say try it, because you never know, it might be your new favorite.

The pretzels and the pimento cheese were both tasty on their own.  But the sum of these savory parts made for a whole that was so intensely delicious I needed to sit down.  I may have passed out from the sheer sensory overload.

A couple years ago, I was making oven-baked pork chops.  I needed some breader.  And I just happened to have the better part of a bag of Utz’s on hand.

After grinding in the food processor, I coated the chops and threw them in the oven.  The special dark specialness did it again.  We loved them.

The other day I was making pork chops had an epiphany: I would make a stuffed hybrid.

Stuffed pretzel pork chops

pimento pork

4-1 ½ inch thick boneless pork loin chops

1 cup your favorite pimento cheese

5 cups Utz Special Dark sourdough pretzels, divided

2 cups heavily seasoned flour

2 cups buttermilk

2 tablespoons vegetable oil

Cooking spray

Prepare stuffing:  Run 5 or 6 pretzels through food processor until finely crushed.  Measure out 2 tablespoons and mix it with pimento cheese.  Set aside.

With a thin flexible knife cut a pocket into chops.  Cut a small slit (2 inches or less), horizontally in the side.  Push knife into pork, being careful not to cut all the way through.  Wiggle the knife back and forth opening up the pocket.

Put cheese mixture into a zip top bag and cut off one small corner.  Place bag into pork chop, and squeeze in about ¼ of cheese into each.  Place into fridge for at least an hour to chill.

Grind up the rest of the pretzels into large, coarse crumbs.  Place into shallow dish.  Put flour into another bag, and pour buttermilk into another shallow dish.

Coat pork with 3-part dredge; shake in flour, dip in buttermilk, and heavily coat with pretzels.  Put back in fridge for another hour to cool and set the cheese.

Preheat oven to 350.  Put oil into a heavy baking dish.  Set in pork chops and give them a spritz of cooking spray on top.

Bake for 15 minutes.  Using a fork and spatula, gently flip them over and bake 15 minutes more. 

Remove from oven and let rest for 5-10 minutes.  Serves 4.

And how did my mom, The Kid, and Fresh Market break me?

They all contributed to spoiling me for any other pimento cheese.  Nobody else’s tastes good anymore.  And when it’s topping a very specific dark brown, knotted piece of dough, I am reclining among the angels in snacking heaven.

Way to go, guys.

Sadly, there’s no kit to fix me…

Thanks for your time.

I’ll get you, my praline


kateys walk 2

The view near The Kid’s house in Woodstock.


After The Kid finished freshman year of college up in Vermont, an internship was landed in Woodstock, NY.  Petey and I flew up, and would rent a car to lug child and possessions to a Craigslist-rented apartment in the Empire state.

*Here’s a piece of interesting trivia that I learned up there: the famous “Summer of Love” festival was not actually in Woodstock NY, but 60 miles southwest, in Bethel NY.  And if every baby boomer that claims to have been there really was, no human under the age of thirty would have been present anywhere else on the planet that weekend.  (Actually, I did go to school with a girl who was one of those naked toddlers in attendance, but she has no memory of it; coincidentally neither do many of the adult concert-goers.)

Anyway, back to the airport…Petey uses a walking stick, and I was concerned that it would be confiscated by the TSA.  I’d done bounteous research, but the rules as written were vague, and open to wide interpretation.  I was a little nervous that a grouchy agent with a toothache or one who’d gotten a call from the IRS would nix the cane, and my husband would be physically penalized for the duration.

I’d planned to make some treats to take up for The Kid to share with friends.  So, I decided to put together goody bags full of my homemade cheese wafers and my creamy, delicious pecan pralines to hand out at security. I was hoping this good will gesture would facilitate smooth sailing through the line.

It worked.

By the time Petey, his cane, and I got through security, we were on a first-name basis with the agents.  We’d reduced one sweet woman to tears because the pralines reminded her so much of the ones her dearly departed granny used to make for holidays and special occasions.

Vanilla Bean Pecan Pralines

pralines3 cups broken pecans

2 cups light brown sugar, packed

1 cup granulated sugar

 1 1/2 cups heavy cream

 1/3 cup whole milk

 6 tablespoons butter, salted

 1 1/2 teaspoons salt

1 vanilla bean, scraped

Toast pecans:

Place pecan pieces in a dry skillet on medium.  Stirring constantly, cook until color deepens and they’re aromatic.  Remove from heat, and let cool.

In medium saucepan, combine brown sugar, granulated sugar, cream, milk, butter, empty vanilla pod, and salt. Cook over medium, stirring constantly, until mixture reaches 230°. Discard pod, lower heat slightly, add toasted pecans and continue cooking, stirring constantly, until it gets to 236°. Remove from heat; let stand for 5 minutes. Add vanilla bean scrapings and stir with wooden spoon until mixture is thickened and slightly creamy, about 1-2 minutes. Using a small cookie scoop, spoon the pralines onto a sheet of parchment paper or waxed paper. If the mixture becomes stiff or grainy, return to burner and stir over medium heat until it can be easily scooped and dropped.

Makes 4 dozen.They were a hit in Montpelier, too.

Our first night in Vermont we were in a hotel, but The Kid was staying at the dorm to finish packing.  A school friend, Chase (Northerner and praline neophyte), came over to hang out with our child.  Despite dire warnings of the richness of the candy, and to his everlasting regret, he polished off the remaining 30 pralines in the time it took to watch Hot Tub Tome Machine.

You ever seen a praline hangover?

It ain’t pretty.

Representation–not The Kid’s school friend.

Thanks for your time.

Flipping a steak…on its ear

Denver steak is one nifty piece of beef.

deners

No…No…Yes.

Even though cows have been domesticated for 5000 years, the cut called Denver steak was only ‘discovered’ in 1990 by meat science professors at the Universities of Nebraska and Florida.

It’s the fourth most tender bovine muscle; just behind filet mignon, the flatiron, and the ribeye cap.  Because it’s a newer cut of steak, it can be hard to find.  Ask your own butcher or try First Hand Food’s Denver steak; they’re a North Carolina supplier of pasture-raised meats (check their website for where to find them).

But as much as I like Denver steak, it’s really the preparation method that’s the star of this piece.  It takes the normal, accepted way of home-cooking a steak, and turns it inside-out.

Reverse Steak

OLYMPUS DIGITAL CAMERA

Served here with sauteed spinach and potato salad.

First dry-age your steak (heavily salt, loosely wrap in paper towel and let rest in fridge for three days).  This will intensify the flavor and get seasoning througout the meat.

When ready to cook, place the meat on a cooling rack on a foil covered cookie sheet.  Insert a probe thermometer (or use an instant-read during the cooking process) set to 120 degrees, and place in a 275 degree oven.

When the steak reaches temp (about 30-45 minutes, depending on thickness) remove from oven, and let it rest while you get a cast iron, or other heavy bottomed pan, screaming hot. 

When the surface is almost molten, sprinkle freshly cracked pepper on each side of steaks.  Drop in some butter, then place in steaks.  Cook until a golden crust is formed, then flip and cook other side.  Let rest for 5 minutes or so, then serve. You’re looking for a final temp of around 125 degrees for medium-rare.

This reverse technique cooks the steak uniformly throughout, with no overly cooked gray ring around the outer edge.  The only caveat is the meat should be at least an inch thick, and the thicker the better.

But beware: you’ll think that you’ve messed up when you take it from the oven.  It comes out looking like a flaccid piece of beef jerky.  It will be ox-blood in color and tired in appearance.  But that’s ok, I promise.

OLYMPUS DIGITAL CAMERA

Sad, isn’t it?  But there’s a happy ending.

Cooking this way cuts down on the smoke and grease-flying of stove-top cooking.  It’s also a more leisurely process, making the preparation of sides a measurably less nerve-racking experience.

Steak night is a big night.  So do it right.  You want to make it memorable because it was so delicious, not because you ruined dinner and ended up dining on Big Macs and Mylanta.

Thanks for your time.

The big bad wolf called…he wants to come for dinner

Alright you guys, today I’m bringing you all along for culinary jalopy ride/scientific experiment.

Here at Chez Matthews, we love smothered pork chops.  But there’s a major fly in the ointment when using modern grocery store pork.

Today’s modern mass-produced pork has very little fat.  Many pork chops, either bone-in or boneless are from the very leanest part, the loin.  This makes for a tender and juicy chop when cooked just to 143 degrees.  But when cooked low and slow this quality translates to dry and stringy.

I’ve been thinking about doing a slow-cooked smothered pork dish that would only get better by a long sojourn in a low oven.

A North Carolina gold mine.

A pork butt (or shoulder), the cut used to make NC barbecue and carnitas, is full of fat and connective tissue that when cooked slowly becomes tender and unctuous.  But, they’re huge hunks of meat.

There is though, a compromise cut.

It’s something called boneless country ribs.  They aren’t actually ribs, but cut either from the blade end of the loin near the shoulder, or the shoulder itself.  The leaner loin-cut rib works here, but the best cut for this dish is the butt.

Happily, it’s also a buck or two cheaper than its leaner neighbor.

Slow-cooked smothered country ribs

Rub:

dry rub

1 tablespoon salt

1 teaspoon pepper

1/2 teaspoon porcini powder

1/2 teaspoon caraway powder

1 teaspoon za’atar

1 teaspoon sugar

1/2 teaspoon onion powder

1/2 teaspoon thyme

Pinch of fresh nutmeg

Mix together and rub all over 2 pounds boneless country pork ribs.  Cover, refrigerate, and let sit 24 hours.

Caramelized onion:

car onions

2 yellow onions, chopped

1 tablespoon oil

1 teaspoon dry thyme

1 teaspoon za’atar

I large bay leaf

Salt and pepper

Put oil in pot on medium low.  Add onions, thyme, za’atar, bay leaf, salt and pepper.

Cook on medium-low until golden amber in a large heavy pot with lid. Remove from pot.

Heat the same pot on medium-high.  Brown meat on all sides in 2 tablespoons vegetable oil.  Remove from pot and set aside.

Mushroom gravy:

shroom gravy

2 pounds mushrooms, cleaned and sliced

1 tablespoon chopped fresh rosemary

2 tablespoons chopped fresh thyme, divided

2 tablespoons sassafras jelly or 1 tablespoon apple jelly and ¼ cup root beer

1 tablespoon tomato paste

1 tablespoon Dijon mustard

2 tablespoons Worcestershire sauce

1 cup white wine

2 cups chicken stock

2 cups beef stock

1 cup skim milk

1/3 cup heavy cream

Salt and pepper

Roux:

roux ing

3/4 cup butter

3/4 cup flour

Melt butter in a small saucepan on medium-low.  Whisk in flour and cook until the color of peanut butter.  Set aside.

Directions:

Preheat oven to 250.  Heat pot on medium-high.  Add mushrooms, rosemary, and 1 tablespoon thyme to pot along with ½ teaspoon salt and ¼ teaspoon pepper.  Cook until liquid has released from the mushrooms and cooked off.  Add cooked onion.  When mushrooms begin to brown, add jelly and tomato paste.  Cook until jelly dissolves and tomato paste has begun to darken (about 3 minutes). 

Pour in wine and cook until pan is dry again.  Add stock, stir in mustard, Worcestershire, and dairy.  Heat until boiling.  Whisk in roux until gravy thickness.  Check for seasoning.  Add in meat and cover.  Place in oven and cook three hours.  When done, skim off any fat from the surface.

OLYMPUS DIGITAL CAMERA

Serve over rice.  Makes 5-6 servings.

Well, it turned out delicious.  The meat was literally falling-apart tender.  The connective tissue had completely broken down and gave it that rib-like mouth feel.

And Petey, who I sometimes think likes pork more than he likes me, loved it.  He claimed the leftover pork and rice for lunch tomorrow.  I also had two deli containers of gravy left.  One portion will be used for baked meatballs in a day or so.  The other’s in the freezer for a future project to be named later.

So, my experiment was successful.  But really, how bad can pork and gravy ever be?  It’s not like my kitchen fiddling was going to create a monstrous porcine/human hybrid.   But just think; if it did we could have had a huge pig pickin’ that could baste itself and make the sides.

Don’t worry, this is actually a still from a Doctor Who episode.

Thanks for your time.


My mom, the awful cook

*Last week the Henderson Dispatch had some serious production issues and my column did not run in the paper.  Since they are running it this week, there will be no new Henderson piece.

Please enjoy this classic column from 2011:

This is the Tree Frog cabin in Linville, NC.  One of my favorite spots on earth.

A dream vacation for me would be weeks in a quiet mountain cabin, or an isolated beach cottage. I’d do tons of cooking with local produce and ingredients.

For my mother, that would be a punishment. She belongs in a bed and breakfast near shopping, and in the center of mild happenings, dining out every meal.

Sooo much more my mom’s speed.

With the same deliberate, reverse pride I have in my lack of algebraic aptitude, Mom will declare her lack of skill and interest in the culinary. “I’m not a good cook, and only do it to eat!”

This is no passive-aggressive bid for flattery. She honestly thinks she can’t cook.

She’s wrong.

You could fill an elementary school auditorium with the people who have eaten her spaghetti sauce once, and forever after jockeyed for repeat invitations to her table with the naked shamelessness of a reality star at 14 3/4 minutes.

Her macaroni and cheese is terrific. Best eaten cold, late at night, and in semi-private. My faithful companion: my eight-year-old self, in a flannel nightgown and bare feet, armed with a Superman fork in one hand, a salt shaker in the other, and a defiant grin. It is comfort food of mythic proportions.

Ask The Kid about Gramma’s chicken-fried steak. Last visit Gramma was implored to not only make it, but to give a chicken fried class.

She’ll occasionally cop to minor skill in baking and deserts. She’s a trained cake decorator (in the 1970s-no-fondant-lots-of-star-tip style). Despite buying the crust, her pies do just what pies should, taste yummy and make you feel loved (a la mode or not).

Each year at a holiday soiree, she feeds everyone lunch, and we ice hundreds of sugar cookies. Not only do we feast, we aren’t allowed to leave without dozens of her deceptively simple but crazy delicious Christmas cookies.

She’s a self-taught wizard of producing sweet treats with very little on-hand, while dodging three loud, hungry kids and all their friends.

NO.RECIPE.

She can make eclairs without fear or recipe. Who does that?

Here are two of my mother’s classics:

The first, wacky cake, is from her mother. I think it was originally a recipe to cope with shortages during the depression and rationing during WWII.
I don’t think there was frosting on the original (Heresy!). But Mom covers hers in a thick warm layer of milk chocolate, fudgy goodness.

Wacky Cake

wacky cake
1 1/2 cups flour
1 cup sugar
3 tablespoons cocoa powder
1 teaspoon baking soda
1/2 teaspoon salt
1 tablespoon vinegar
3/8 cup?! (I know, weird; sorry.) vegetable oil
1 teaspoon vanilla
1 cup cold water

Preheat oven to 350. In a lightly greased 9 inch cake pan put in dry ingredients. Make a small well in the center of the dry and pour in wet ingredients. Mix together and bake for 30-35 minutes or until toothpick comes out moist with just a couple of crumbs clinging to it. Cool, then cover with warm fudge topping.

Fudgy Milk Chocolate Icing

fudge icing
Melt three tablespoons of butter in saucepan. Whisk in 2 tablespoons cocoa powder. When dissolved, add 1 1/2 cups powdered sugar, 3 tablespoons whole milk, and 1 teaspoon vanilla. It will look like you’ve made a mistake, but keep whisking and it will turn to a glossy yummy glaze. Also good on marble brownies.

The other is a recipe picked up at a horse show potluck in Puerto Rico, and named for a trendy playdoh-type toy we all had then.

Slime

slimePrepare large box lime Jello according to package directions. When cooled, but not set, pour into blender along with one 15 oz can of pears, drained, and one 8 oz block of cream cheese, softened. Blend until completely smooth. Pour into mixing bowl and fold in one packet of Dream Whip (Whipped topping mix found in the baking aisle. Can substitute thawed, 8 oz tub of Cool Whip) made according to directions. Let set for at least four hours before eating.

Don’t ask me why, but we all had to have this stuff.

Thanks for your time, my father’s sweet tooth, and Mom’s bake sale fantasies.


Use your bean

I get excited about all kinds of things…English muffins just happen to be one of them.

So I was making an English muffin for this morning.  I was really looking forward to it (even more than I usually look forward to any and all food).

The reason I was so eager to get at an ordinary piece of toasted carb is because of which spread I was planning to use.

I’ll admit it right here—I have a problem.

It’s an irresistible need to possess copious varieties of jams, jellies and preserves.  If it’s shiny, sweet, and in a jar, I’m in.  I pick them up wherever I go, be it grocery store, garden center, or even somewhere unexpected like TJ Maxx.

There are 18 different jars in my fridge right now.  And that’s not counting the various honies, golden syrup, and Goober Grape residing in cabinets.

jam shelves

This is most of them, but I have more jars than I have shelves.

About a month ago I was in Home Goods, at Brier Creek.  I love them for their uncommon pasta shapes and jellies.  That day I picked up short multi-colored ridged lasagna.  And, I bought a jar of pineapple jam.

I’ve never thought of preserving the fruit.  I love it fresh, and not much beats a piña colada made with pineapple juice, Coco Lopez, rum, and vanilla ice cream.  Happily, it turned out to taste just like the fruit, and really good on the whole-grain toast and English muffins that I prefer.

As good as it is, that didn’t stop me from what I did to it a few days ago.  I mixed in a heaping tablespoon of vanilla paste.  I closed it up and put it back in the chill chest for a bit so the flavors could mingle.

So that’s why I was so looking forward to breakfast today.

4 forms

While my bread was in the toaster I got to thinking about the four fantastic forms of vanilla: beans, extract, paste and powder.  I always try to have some of each in my kitchen, and they are awesome for jacking up the flavor of all kinds of things.

Vanilla beans: Scrape out the beans with a paring knife and use like you would extract (one bean=one teaspoon).  But when used in light colored foods the flecks of beans enhance the visual which in turn enhances the whole experience.  I love putting them in flavored butter, pudding, and homemade marshmallows.

Don’t toss those empty pods, either, throw them in your sugar canister for vanilla sugar, or add 4 pods to a pint of rum or vodka for homemade extract.

Extract: The old baking standby is also terrific added to unexpected dishes.  Try it in barbecue sauce, salad dressing and marinades.  Use it to make vanilla coke and to give French toast and pancake batter extra zip.

But please, for the love of all that’s holy and healthy, only use pure vanilla.  Although it’s no longer produced by milking the anal glands of beavers (yipes), it’s still made with eucalyptus oil, to which many people are allergic, pine tar, and the wood pulp left after making paper.  Mmmm…pulpy goodness.

Paste: Terrific for adding to prepared foods, like honey and syrups.  Paste also makes lemonade and iced tea into something really special.  Whisk a teaspoon of it and a tablespoon of brown sugar into 1 cup of sour cream for fruit salad dressing or cheesecake topping.  Paste works really well as a mix-in for instant hot cereals.

Powder: When baking, I always shake some into my dry ingredients.  It supports and enhances the extract or beans that I add to the wet ingredients.  For the best cinnamon toast you’ve ever had mix ¼ cup sugar, 1 tablespoon cinnamon, 1 tablespoon vanilla powder, 1/8 teaspoon freshly ground nutmeg, and a pinch of salt.  Try adding vanilla powder to coffee or sprinkling it on halved stone fruit before grilling.

I’ve also cooked down apple jelly with vanilla beans.  The apple flavor fades, and I’m left with an intense vanilla jam to add to my vast spread collection.

And I know that they say admitting you have a problem is the first step to recovery, but I have absolutely no plans to address my affliction (although I have overheard whispered conversations between Petey and The Kid using phrases such as jelly intervention, and jam rehab).

Yeah, yeah, pass me the biscuits; I just got some sassafras jelly.

sassafras

Here is my newest baby.  It tastes kind of like root beer jam.

Thanks for your time.

The big chill

Cryostasis. According to the Oxford dictionary, it’s “A frozen state of a person…induced in order to preserve it for long periods; cryosuspension.”

Well, it’s not just for deep space travel and Walt Disney anymore.

The Kid and I adore avocados.  It wasn’t always this way.  We developed our love for them through their most famous gateway drug; guacamole.  But we now love them on toast, sliced and salted; just about any way.

Avocados can be a giant pain in the keester, though.  If you’re buying and eating on the same day, good luck.  Stores get them in as hard as a baseball; they ripen on the grocer’s shelf as they wait to be picked to go to a new home.

So choose them according to when you need them.  4 or 5 days out?  Buy rocks.  For a couple days from preparation, pick ones that give just a little to gentle pressure.

At Costco there’s plenty of choices.  Take your time, and pick out a bag of boulders.

I buy a bag of six from Costco, and try to get the hardest ones they’ve got.  This gives me a few days grace to get my ducks in row, and be prepared for when they’re ripe.

But what to do when the avocado is ready and you’re not?  Because everybody knows that when a good avocado goes bad, it joins a gang, gets a face tattoo, and starts bullying onions and tomatillos for their lunch money.  And they only possess perfect, delicious ripeness for twenty minutes or so.

This is where the cryostasis comes in.  If you have a mess of fully ripened avocados (they’ll give to the light pressure and be slightly softened all over,) lying around the kitchen, set them, unwrapped, in the fridge.

I refrigerated ripe ones with the idea of using them in a few days.  But I figured what would happen is that I’d cut into one and discover something so bruised it would be as appetizing as a cigarette put out in a piece of birthday cake.  Last Tuesday, 2 days after stashing them in the chill chest, I took out a perfect avocado; no strings, no bumps, no bruises.

And then I made my new favorite avocado dish.

Avocado and spinach pesto

avocado pest ingredients

12 ounces short pasta

3 ½ cups raw baby spinach

2 avocados

½ cup grated Parmesan cheese

Juice of 2 lemons (bout ¼ cup)

¼ cup olive oil

¼ cup chives or scallions

1 teaspoon kosher salt

1/2 teaspoon fresh cracked pepper

1 cup reserved pasta cooking water

Cook pasta according to directions in heavily salted water.  Microwave spinach for about 1 minute 45 seconds or completely wilted.  Place into food processor.

When the pasta has five more minutes, make sauce. 

Add the avocado meat, cheese, lemon juice, olive oil, salt and pepper.  Process, adding enough hot pasta water until it’s sauce consistency.

Drain pasta and return to pot.  Pour sauce over and gently stir to coat.  Garnish with chives.

Serves 2-4.

OLYMPUS DIGITAL CAMERA

The pesto would also make a good dressing or dipping sauce. 

This stasis trick is even more amazing.  Last Tuesday, 2 full weeks after entering stasis, The Kid cut into a refrigerated avocado.  It was perfect and delicious.  I think we’ve cracked the code.  No more waste.  With all the scary avocados I’ve tossed in my life, I could probably finance a week’s vacation to Kill Devil Hills, and bring along Petey, The Kid, and the dog too.

Best of all, avocado’s pernicious stranglehold over me has been broken.  They’ll be eaten and used at my pleasure.  I will never again be a slave to botany.

Thanks for your time.

You Can Be My Lucky Charm

How do you prefer your banana pudding?

Whipped cream?

Or meringue?

When I was pregnant with The Kid, we went up to New Jersey for what turned out to be a surprise baby shower.  The festivities were a bacchanal of Jersey-Italian party food.  Meatball and sausage sandwiches, enough potato and macaroni salad to fill a box car, and cake adorned my aunt’s groaning dining room table.

That cake.

Evidently, whipped cream is a desired cake topping for some benighted folk up there.  But I am a member of team buttercream.  Frosting’s one of my favorite foods.  Unfortunately, whipped cream was ordered.

Because my pregnancy hormones had already caused me to cry once that day, I used every ounce of my gestationally-frayed self-control and refrained from sobbing in disappointment.  But I ate no cake at my own baby shower.

You know what, though?  I think I’m good on the whole whipped cream thing.  I mean, considering this possible alternative.  My whipped cream cake  was just white with plastic babies on it–not in it.

But on banana pudding, I choose whipped cream.  Because I really dislike meringue.

Until last week.

I get weekly emails from McCormick Spice Company.  The latest one had a recipe for meringue cookies.  I studied it.

On this recipe, and every other I’ve ever seen, there are dire warnings to never attempt making meringue on rainy or humid days.  It was pouring out, but I had a theory.

My theory was that modern homes are built so air-tight that they cut down humidity to negligible levels.  As a purely scientific experiment (certainly not to eat), I’d create meringues.

Starting with the recipe they supplied, I changed it up a bit, and went to work.

Classic Vanilla Meringues

meringues supplies

4 large egg whites

1/2 teaspoon cream of tartar

1 cup sugar

1/2 teaspoon kosher salt

1 teaspoon vanilla extract

Preheat oven to 225, and line 2 cookie sheets with parchment paper.

Place egg whites into bowl of stand mixer.  Beat on medium until they lighten in color and begin to increase in size.  Slowly add cream of tartar.

When they turn white, slowly add sugar a tablespoon at a time.  When added scrape down sides of bowl.

Turn mixer back on. Running on high, slowly add salt, then vanilla.  Beat until glossy, and stiff peaks form.OLYMPUS DIGITAL CAMERAUse large pastry tip fitted on zip-top bag (or, if you don’t have a pastry tip, cut about 1/2 inch off one corner of bag). Fill with meringue and pipe onto parchment paper into circles of 2 inches wide.

Place both oven racks close to center and put one cookie sheet on each rack.  Bake for 30 minutes then rotate sheets.  Bake for 30minutes more.  Turn off oven and let meringues sit in oven for one hour. 

Because they’ll absorb moisture from the air and get soft, store them in airtight container.  You can re-crisp them in a 225 oven for 15-20 minutes, but they’ll never be as perfect as when fresh.

Makes 30 cookies.OLYMPUS DIGITAL CAMERAThey take flavor easily, so play with extracts.  Mocha, for instance; add 2 tablespoons of cocoa with the sugar, use coffee instead of vanilla. 

So, my theory proved correct.  They turned out crispy, and to my huge surprise, crazy yummy.

They’re also only 26 calories apiece and both gluten and fat-free.

The best part is these addictive little treats are very much like marshmallows in Lucky Charms.  My whole life I’ve wished for a box that somehow slipped through quality control, and held no cereal, but was filled solely with marshmallows.

It does exist.  If this is true, who knows what else is real?  Maybe Pauly Shore is funny, and Kanye is talented.

Now when I get that feeling, I can, in twenty minutes, turn out a pan of homemade ones the size of hockey pucks.

It’s good to be alive.

Thanks for your time.

Ate My Fill On Blueberry Hill

About six years ago, I was disgusted.  And also, scornful.

image(1)

That’s me in 11th grade with my best buddy, Waldo.  Fat and spotty–it’s a wonder that boys weren’t lined up around the clock…

Since junior high my weight had stayed around 185.  I’d fluctuate; from an infrequent low of 160 to my max weight of 227 after The Kid’s birth.

But finally, I made a decision.  My weight was creeping back up to 200, and my clothes felt tight and uncomfortable.  I was sick and tired of being fat.

This time, I made two changes that made all the difference.

I increased my activity level from nonexistent to light.  As I got healthier, I moved more.

And I finally realized that losing weight was just the beginning.  I had to keep the weight off once I reached my goal.  But I also knew there was no way I could live the rest of my life only eating rice cakes and poached chicken.  A life without potato salad and cake was not a life in which I wanted to participate.

My primary strategy would be to limit calories.  One meal per day would have a maximum of 300 calories.  Then I’d eat a normal dinner with unlimited fresh fruit or veg between meals and a bite of something sweet before bed.

This is an actual picture of me, grazing.

This I could live with.

I had another tactic.  I would absolutely not eat flavorless “diet food”.  I held “frou-frou” food in complete disdain.  Most healthy swaps little resembled the food they were imitating, and not only did they not hit the spot, they had no idea where the spot was, or what to do with the spot if, on the offside chance, the spot was located.

But.

If there’s a healthier option for something, I give it a go.  If I’m unable to tell the difference between the more voluptuous version and its healthier variation, I go for healthier.

This diet philosophy worked.  It’s been five years now, and my weight stays around 128 pounds.  I wished I’d figured it out decades ago.

Last week when Petey and I were in Whole Foods, Demo Specialist Joe DiBario had a table set up and was serving Portobello sliders.  For dessert, he’d made a delicious treat that I ended up buying.  At home, after I polished it off, I called the store and asked for the recipe.

It’s a creamy blueberry pudding topped with goji berries and cooked dried apples.  I could eat a bowl of the apples and goji by themselves.  They’d make an awesome topping for all kinds of things, like oatmeal, or pancakes, or even on pork chops.

It becomes pudding by using chia seeds, a food that a few years ago I would have laughed at, not eaten.  Chia seeds are insanely good for you and when allowed to sit in a liquid will swell and form into a texture that is quite similar to tapioca pudding.

Team Leader Andrea Mastrobuono, was kind enough to act as a go-between, get the recipe from Joe, and send it to me to include in today’s column.

Blueberry Chia Pudding with Turmeric Apples and Goji Berries

Blueberry chia pudding:

blueberry puddng

1 cup chia seeds

3 cups apple cider

½ cup crushed blueberries + ¼ cup whole

Zest and juice of ½ lime

½ tablespoon honey

¼ teaspoon allspice

Pinch of salt

Combine all ingredients in a bowl and whisk together. Refrigerate for 3 hours.

Turmeric apples:

turmeric apples

1 cups agave syrup

Juice and zest of ½ lime

Pinch of salt

1 tablespoon turmeric

1 cup dried apples

In a small saucepan, combine agave, lime, salt and turmeric and bring it to a simmer. Remove from heat and pour over dried apples.

Goji berries:

goji

¼ cup goji berries

¼ cup orange juice

Cover Goji berries with OJ and let them sit at room temperature for 15 minutes.

Assemble the dish with your pudding as the base and top it with turmeric apples, and goji berries.

Makes 8-10 servings at around 200 calories each.

This pudding is the kind of thing I want to eat on a rainy day fresh from the shower.  Whether you’re watching your weight or not, it’s delicious.  But it just happens to be better for you than a handful of Flintstones chew-ables.

I loved Romper Room, but Miss Carol never, not once, saw me in her fickin’ magic mirror.

Definitely, happily, on the do-bee list.


Thanks for your time.